Wednesday 2 January 2019


  SSL CONFIGURATION FOR APACHE USING OPENSSL


1.      Open command prompt (As Administrator) and change directory to “C:\Apache24\bin”


2.      Type openssl.exe and press enter.


Type - genrsa -out Private.key 2048   - Press Enter


4.      Generate CSR
              Step 1 Type the following command and press enter
                 req -new -key private.key -out Domain.csr -config C:\Apache24\conf\openssl.cnf


           Step 2 Then specify Country Name , State or Province , Locality or City, Company ,    
                            Organizational Unit, Common Name (host+domain name).                                                                   
               Leave Challenge password and optional company name empty by pressing Return key.


          5. Once CSR file is generated, proceed to enrolment from CA to get SSL certificate.


          6.  Download SSL certificate and extract it's content into C:\Apache24\bin folder.


         7. Edit C:\Apache24\conf\httpd.conf in Notepad and remove # preceding following lines:

·         LoadModule ssl_module modules/mod_ssl.so
·         LoadModule socache_shmcb_module modules/mod_socache_shmcb.so

·         Include conf/extra/httpd-ssl.conf


       8. Open up c:\Apache24\conf\extra\httpd-ssl.conf  in Notepad to make changes.

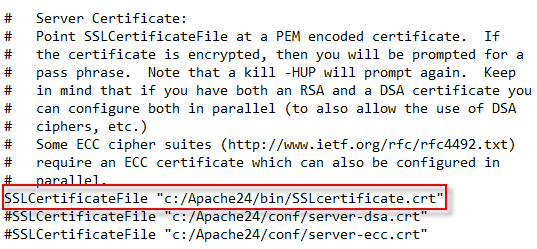
                STEP 1 Give file path for SSL certificate (.crt file) provided by CA.


                STEP 2 Give file path for private key which you generated in Step 3.


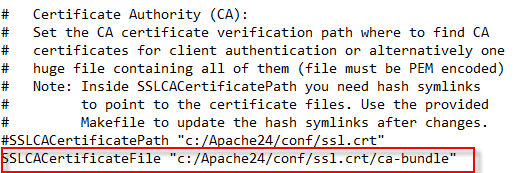
                STEP 3 Give file path for CA-bundle provided by CA in Certification Authority.


          9. After doing all the steps restart Apache service.
                                                           

       10. Open browser to check whether URL is secured using HTTPS or not.


Allowing Remote Desktop
1.     Open Server Manager. By default Server Manager will open when you log in to the GUI, otherwise you can select it from the task bar.
2.     Within the Server Manager window, select Local Server from the left hand side. You may need to wait a little for it to detect the current state of your system. You should see that Remote Desktop is listed as Disabled as shown below.


3.     Click on the Disabled text which will open the System Properties window in the Remote tab.
4.     From the System Properties window, select “Allow remote connections to this Computer” as shown below.
Tip: You can also open the System Properties window shown above by entering “SystemPropertiesRemote” into a Command Prompt or PowerShell terminal.
5.     Once you select “Allow remote connections to this computer” the below warning message will appear, advising that this will create the required firewall rules in Windows firewall to allow remote desktop traffic in from any source address, select OK to proceed.


6.     At this point you can optionally click the “Select Users…” button to define specific users or groups that have permission to connect via remote desktop. Select the OK button to close out of the System Properties window and enable remote desktop.
7.     Back in Server Manager, Remote Desktop may still show as Disabled until you refresh the view. After clicking the refresh button as highlighted below, the status should update to Enabled.
That’s it, remote desktop should now be ready to use!